Graduated Yesterday

October 31, 2010

After three years of work I finally graduated from college yesterday. Everyone had to pre-book the robes for the ceremony online a few weeks prior to graduation day, then on the day itself we picked them up in the nursing building.

Me in my graduation robes

The ceremony started yesterday at 1pm but everyone had to be there in their seat 20 minutes before the start. I arrived at 12pm just so I could get organised, getting my grad ball tickets, robes and meeting up with people before we went into the graduation hall.

The ceremony itself was actually quite short, it started off with a brief introduction with some heads of the college and then it was straight into the calling of student names to collect the certificates. Each student was called by the head of whichever department your course was in.

Once my name was called out I went onto the stage, shook the college presidents hand,  got my degree and then went back to my seat, I was a little nervous once I was in the queue waiting to go on stage, I was fine while I was sitting down beforehand!

My Degree - Sean Lucas

After all the degrees were given out a short speech was given again and then everyone left. Followed by the ceremony was what seemed like paparazzi! Everyone was taking photographs of everyone, as the photographer said later to us when our class was getting a group photo “Enjoy it”, sure why not it only happens a few times in your life if you are lucky.

Class Group Photo - Graduation 2010

Later I went out for some dinner with my family and then I went on to the graduation ball which didn’t start until 10.30pm! Quite late I thought, it went on until 2am. It was definitely a great day & night overall and with a bit of luck, this time next year, I will be doing it all over again!

So I now have my first ever degree and I could not be happier, the degree I received was: Bachelor of Science in Computer Applications & Support with and overall grade of Merit 1.

Disable Windows 7 welcome screen

October 28, 2010

For some reason, every so often the windows welcome screen suddenly starts coming on at start-up even if you have no set password. It often happens to me after I install some new program, but I don’t know why installing a program would cause the welcome screen to come up!

10

I usually start my computer up and walk away for a while and when I come back I expect the desktop to be fully loaded, but when a program messes with the configurations of the welcome screen it just causes hassle.

Anyway, after a while I found out how to disable the welcome screen if it suddenly starts coming back up, to do disable the welcome screen simply follow these steps.

  1. Click the start button
  2. type run in the search bar and press enter.
  3. type netplWiz.exe and click ok
  4. Uncheck “Users must enter user name and password to use this computer.”
  5. And finally click ok

Such a short and simple process, and yet it causes a load of hassle, hope this helps anyone that has run into the same problem I have from time to time.

Get yourself a professional email address

October 25, 2010

If you want other people to take you seriously online then you have to create a good image for yourself. If you meet someone and they want to find out more about you then they will most likely look you up online to find out who you are, Sean MacEntee wrote a good post on this last night, it explains the importance of creating an online presence for yourself.

Why?

Another area that is vital is your email address, lately I went to a job fair in Dublin called gradIreland, that was an event organised which would allow you to go and meet potential employers, while I was there I attended a presentation and the woman presenting it informed us of the importance of business cards, that it makes a great first impression of you if you can just pull out a business card rather than giving someone a rough scrap of paper with your details on it.

gmail for domains

So the information you will most likely include on your business card would be your name, occupation, skills and contact details which would comprise of your website, phone number and email address. So all of those details seem reasonable to have on the card, however the only thing which can really destroy you with those details is the appearance of your email address.

A lot of people use their email address which they most likely created years ago when they were young and not as aware of the potential it could be used for. So as a result a lot of people have silly email addresses for example: [email protected] or [email protected]. These emails look bad to people you meet and would bring the appearance of your business card down.

So you could try and register your full name if that is even available, usually it is not, unless you have a very unique name! The best option is to make a custom email address with your domain name, if you do not have a domain name, then register one!

So I own this domain www.leateds.com and I have set myself up an address which look like this: sean [at] leateds [dot] com, that is short and looks good, no numbers or stupid names of your favourite sports person!

How?

So how did I make this custom email address? It is actually really simple, my email address is hosted by Google using their Gmail for Domains.

To set this up on your site you first need to go and register for this free service, providing you are not a business! Once you have registered for this service you will need to verify your domain name, the best & quickest way is to upload a HTML file Google give you!

email name

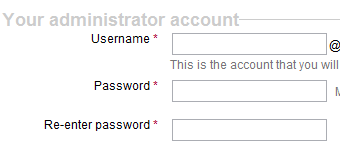
During registration you will be asked to give a username, just add in your name, I added in Sean, this username will be used as your main email address for you domain, you can add more later if you want.

The next step is to add Google’s MX Records to your domain name, to do this you need to log into your hosting account, for this example I am going to use Blacknight, but you can use this for whichever hosting provider you use.

Adding The MX Records

login blacknight

  • First log into your hosting account
  • Next go to your “All domains” page and click the domain you want to add the custom email address too.
  • Click the DNS tab.
  • Then the DNS Record Tab.
  • Then choose “Add New DNS Record”
  • Set the type to MX and click next
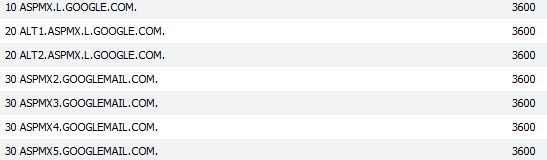
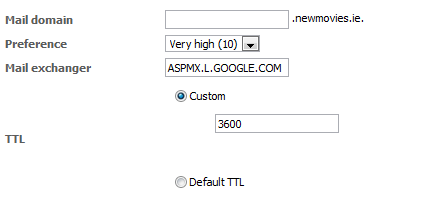
  • Fill in all the MX records (list of MX records below) one at a time, fill in the fields like this:

sample mx record blacknight

  • Add each record individually and click the finish button.

If you are not allowed to add any new DNS records to your domain then you will have to enable Zone Management Ability in the summary tab of you domain name.

blacknight zone management

Providing you have followed all these steps, then now you have your own custom email address on your domain which will look great on your business cards too :D! It may take a few days for Google to process your new email address, but they are usually quick enough and get it sorted within an hour or two.

Below is a picture of the 7 MX records you need to add, the first column is the value for the Preference box, the second is for the mail exchanger box and the final number is for the custom TTL box. note the period (.) at the end of the mail exchanger address is not to be added.

google mx records

New blog design – finally live!

October 22, 2010

The theme I have been working on for the last few months on an off is finally live. I was really pushing it over the last week to get it finished. With college work piling up I wanted to complete the design so I could focus more on college.

So if you have been on my blog before you will immediately notice the difference, first off its WHITE! Last time is was all dull and dark black and green, now though it is like it has been completed inverted and is now a simple two tone colour of blue and white which I really like. In case you forget, below is a picture of how it used to look and how it now looks!

old leateds

new leateds

Since this is my blog there was a few things I wanted to change, and since I spend a lot of time on the site I thought it was important to have it nice and bright and easy on the easy, not dark! So that was the first change I implemented into the design. The next thing I wanted was to widen the area where my blog posts display, it has always been too squashed and if I write a long blog post it would carry down the page forever! Now though it has plenty of room at 715px wide just for the blog posts, the total blog width is now 1024px.

I have now got live stats of my twitter and RSS followers, the RSS followers is a bit low but sure I don’t really care, it’s just a number. As you can see I have kept my old logo as I mentioned in yesterdays post, I was really happy with it so why change it!

Last night I took my site down offline around 1.30 am and started working on setting up my clean install of wordpress, I wanted to start fresh with this design so I had a lot of backing up to do with plugins etc. I ran into a few problems with my new database but I got that sorted after a short while.

I ended up having everything up and running again by 3.00 am and it was taken back out of maintenance mode. I still have a lot of tweaks to make in relation to other plugins I need and I also have a problem with the CSS of my bloggers list that usually is in my sidebar, but when I added the theme to this blog it suddenly broke its style I set it and I didn’t have time last night to fix it, the bloggers box is working perfectly on my test domain!

A few other things I added which I think are noteworthy are that I have upgraded my search engine on my blog, I am now using Google custom search engine to power my results, it is a lot better than the default wordpress one and it also has the added benefit of not making my server & database work to hard as the search queries are run through Google servers :D!

another change I added is under the title of every blog post I make from now on and in the past, it now show the exact date and time I publish my blog post, this is useful as I have a personal rule where if I do not have the blog post up by midnight, first off I have failed and secondly I just won’t put it up if it goes after that time.

So those are the major changes that I have made, I will go into my views on designing wordpress themes from scratch in another post some other day, possibly next week. So hopefully you like the new design too, if you have anything then feel free to let me know in the comments (which I built 🙂 took ages!).

comfortable with CSS

October 18, 2010
A perfect desktop image for CSS developers

Image via Wikipedia

Over the past few weeks I have been working very hard on my theme for this blog and I am definitely making a lot of progress on it. I have always been familiar with CSS but not completely comfortable with it.

Over the weeks that I have been working on the theme, I have had to come to grip with a lot of CSS work, and CSS is now becoming second nature to me. I know this is something I should already know the in’s and out’s of by now, but I really just use what I need to get the design done.

I have now learned a lot of new CSS tags that I never knew existed!

Tonight I spent a lot of time designing my comments section for my new design, I know that it is an important part to a blog so I wanted to get it right. I have fully implemented my colour choice that I used in the rest of my theme and I also incorporated Gravatars into the comments section, I know I already have these in my current theme, but these were not in my new theme until tonight.

I have also introduced nested comments into the new design, this is completely new to my blog. I think this will be very useful as some of my posts do receive a lot of comments and with having nested comments it allows for people to reply to other comments and it will stand out that there is a reply to it whereas before all the comments were clumped together and were a little harder to distinguish between.

So now all that remains on my new theme is a few minor tweaks and my logo and then it will be complete and I can finally release it and hopefully receive some honest criticism on it :D.